

After spending over 1,000 years in the soils of Galloway, it’s no wonder objects from the Galloway Hoard needed some serious work before going on display. Bethan Bryan talks through the complex process of conserving a silver brooch, from mending “mini-volcanoes” of copper erosion to using porcupine quills and algae-derived gels.
It has been a delight and privilege to conserve one of the brooches from the Galloway Hoard. My background is in early medieval archaeology, and so it was a dream come true to be offered the chance to work on such a beautiful and historically important object. The work involved detailed scientific examination and analysis of the corrosion and materials of the brooch, and then conservation of the brooch itself.
The Galloway Hoard, discovered in September 2014 by a metal detectorist, contains over 100 objects including silver jewellery and large quantities of silver ingots. Many of the hoard’s objects, including several silver brooches, were contained within a silver gilt vessel buried at the beginning of the 10th century. Clearly, silver makes up a considerable part of the Galloway Hoard’s story.

The object I worked on was a silver and copper-alloy composite disc brooch. It is the smaller of a pair of very similar brooches within the hoard, which overall contained seven Anglo-Saxon disc brooches of a kind not found before in Scotland. A similar brooch was found in the Pentney Hoard from Norfolk, England.
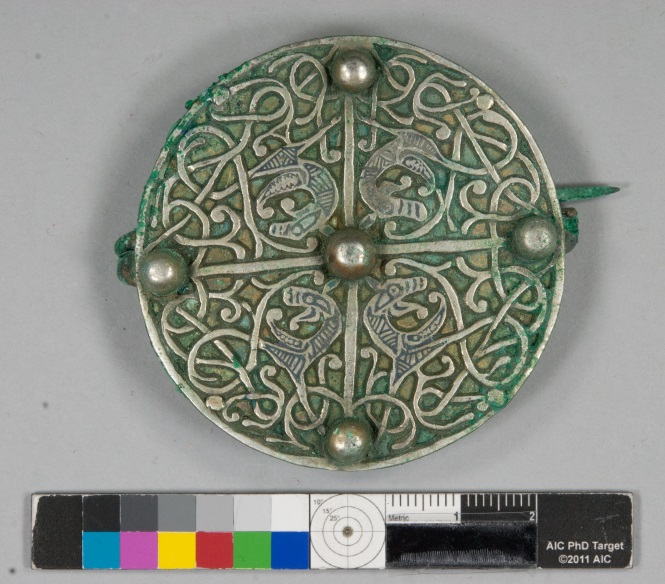
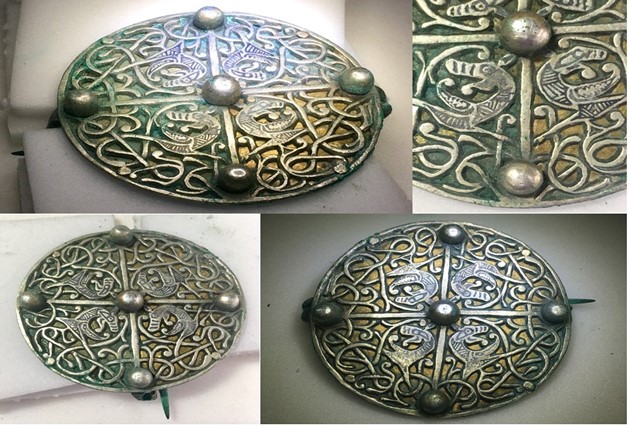
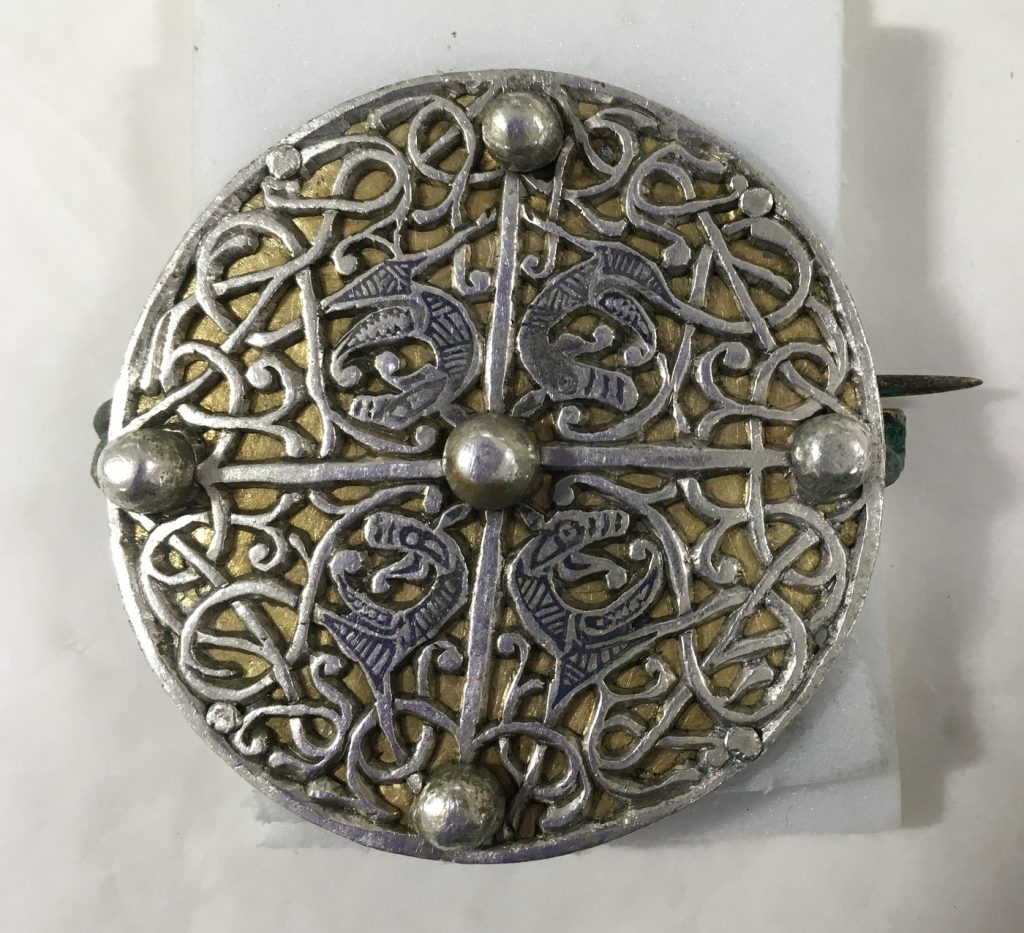
The front of the brooch is a disc of silver with pierced or/cut open-work vine decoration and a central, equal-armed cross. The gilded front surface of the copper-alloy back of the disc can be seen through the cut. The front of the brooch is decorated with four open-mouthed beasts’ heads, each adorned with niello inserts. Niello is a black metallic alloy of sulphur, usually alloyed with silver or copper. It is used to fill designs that have been cut into the silver surface. There are also five silver, spherical bosses. The silver and copper-alloy discs are riveted together with silver pins. On the back of the brooch is a spring-hinged pin and catch plate also riveted on to the copper-alloy disc.
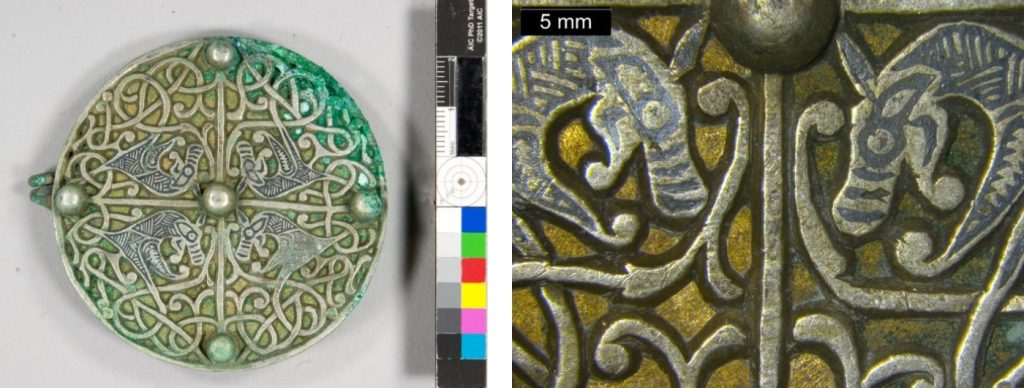
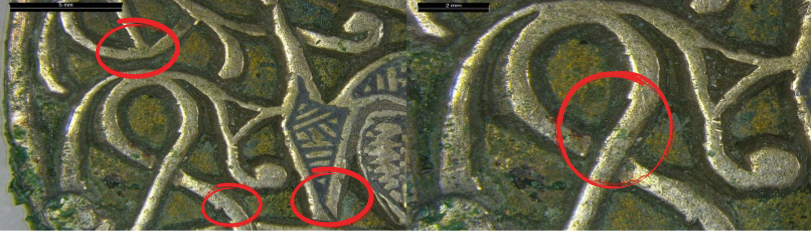
The decorated front has been cut by hand. Imperfections can allow us to feel a human connection with the maker; tool cut marks are visible in places on the silver, and the vines are irregular in shape and size. The four beasts’ heads have also been decorated individually, each bearing its own unique pattern of niello-inlay.
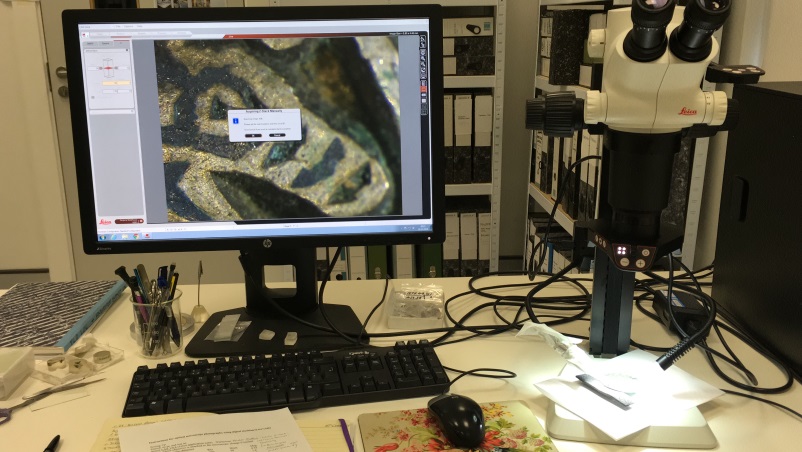
Before any conservation work could begin, the brooch was fully assessed, recorded and photographed. This included taking X-rays and photomicrographs to record the surface in detail, small samples of the corrosion products, and analysis under the Scanning Electron Microscope.
Once the brooch was fully recorded, it was time to conserve it. The back of the brooch was heavily corroded around the edges. Cleaning tests were performed on samples of copper alloys and silver by Dr Mary Davis, the lead conservator for the Galloway Hoard project, to assess their potential effect on the brooch.
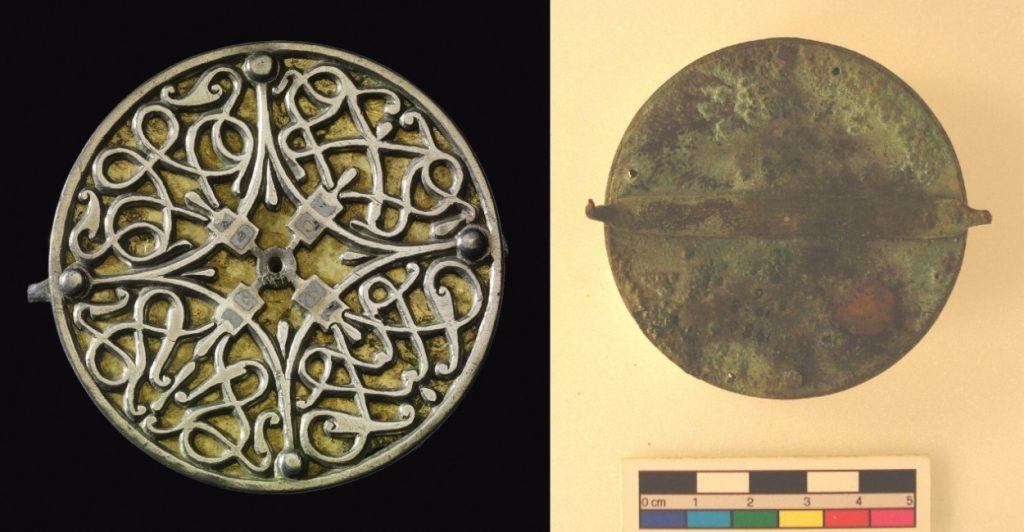
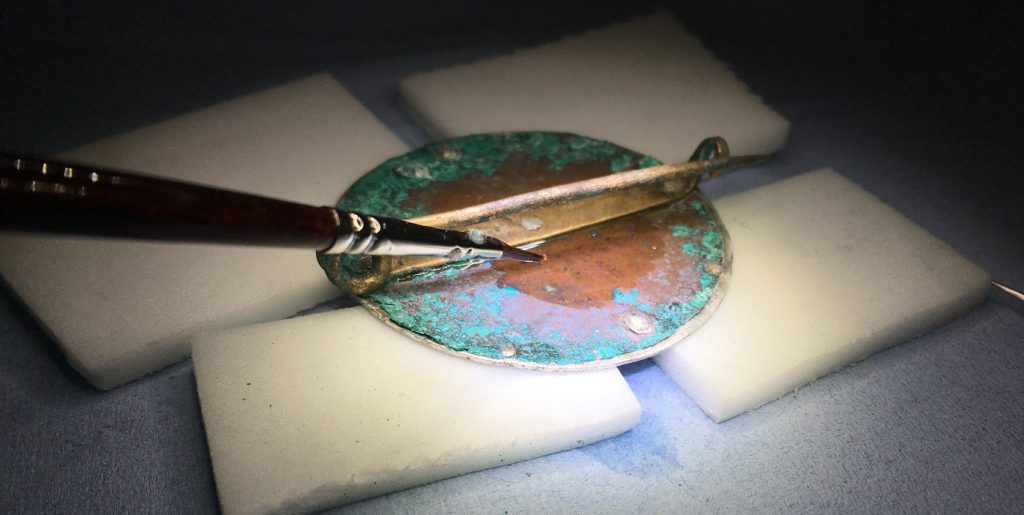
 The back of the brooch before conservation, showing the copper-alloy back plate and spring-hinged bin and clasp, and the heavy copper corrosion around the edges.


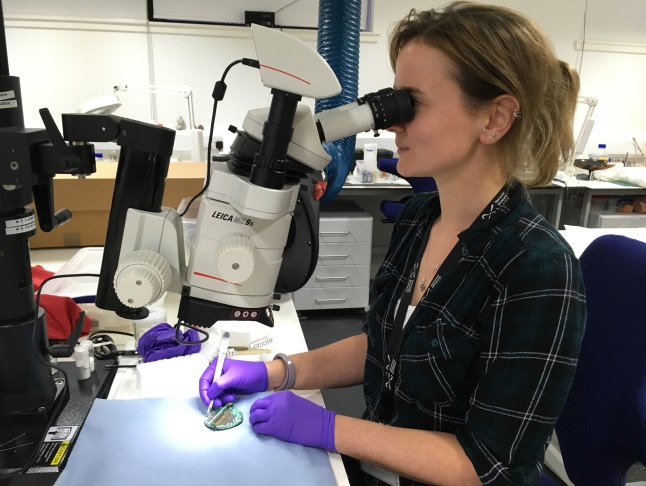
It was decided from these tests that the best way to remove the corrosion from the copper-alloy back-plate of the brooch was to do so manually with a scalpel, under a microscope. This way the corrosion removal could be carefully controlled, and no chemicals would potentially change the underlying surface condition and colour of the copper-alloy.
The copper-alloy back-plate was very thin and delicate in many places, especially around the edges. Some areas had to be consolidated with Paraloid B72 to give them enough strength to prevent loss of material during the conservation process. Paraloid B72 is an acrylic polymer and is used a lot in conservation as both an adhesive and a consolidant. In some places it was discovered that the back-plate had corroded through entirely, and so removal of the corrosion revealed small holes. The edges of these holes were also consolidated with Paraloid B72.
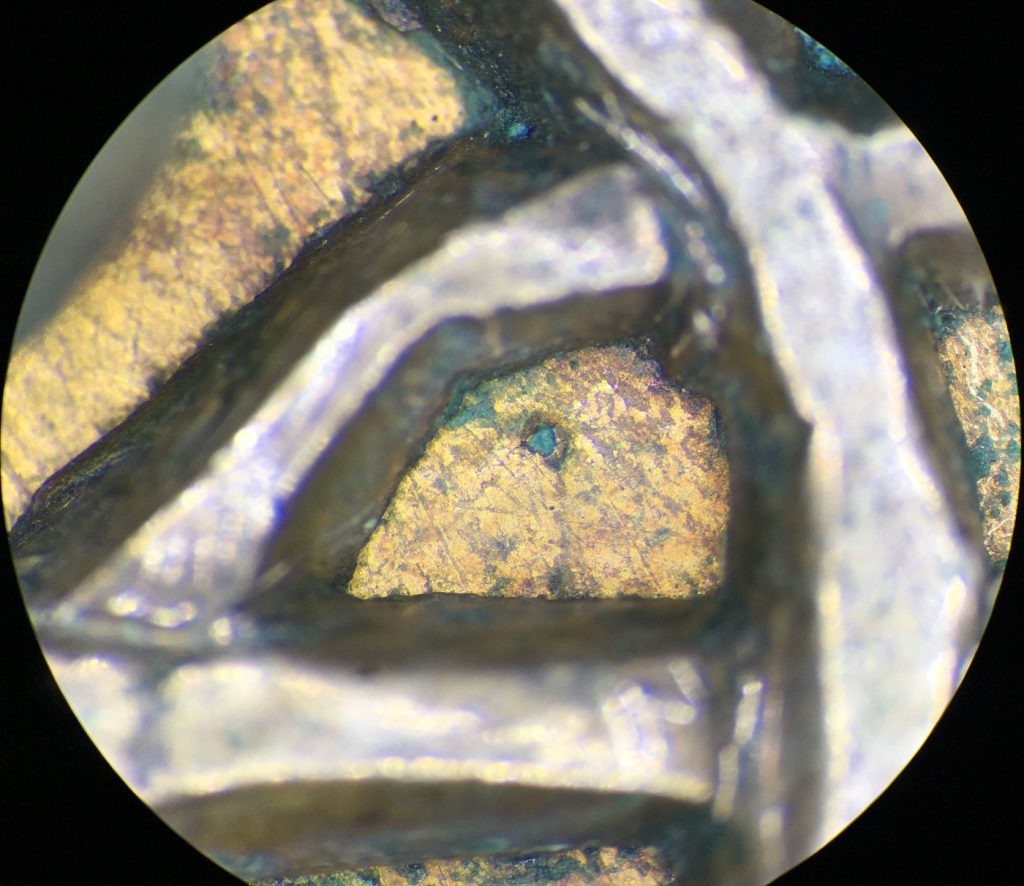
There was much less corrosion on the front of the brooch, and the silver was in a better and more stable condition than the copper-alloy of the back plate. The corrosion on the gilt surface of the front of the back-plate was removed with a porcupine quill tip, under a microscope. The porcupine quill was strong enough to manually remove the copper corrosion spots, but soft enough not to scratch the soft and thin layer of gold.

The softer areas of green copper corrosion on the front silver disc of the brooch were also removed manually with a scalpel, under a microscope. The tougher corrosion spots on the silver were first softened with an agarose gel, and then removed with the scalpel.
Agarose gel is made from agar and is non-toxic and eco-friendly. Agar is derived from certain types of algae and is a type of carbohydrate (for example, starch or cellulose) called a polysaccharide. It is soluble in hot water, can be used to form a gel and is stable in both alkaline and acidic conditions. The gel acts as a molecular sponge and solubilises impurities, drawing them away from the surface, and then holds the impurities within the gel matrix. The gel I used included in the mix alkaline Rochelle solution (a mix of sodium hydroxide, potassium sodium tartrate and water). This solution has been used at the British Museum for the past 50 years for cleaning debased silver coins (silver which has a large copper content).

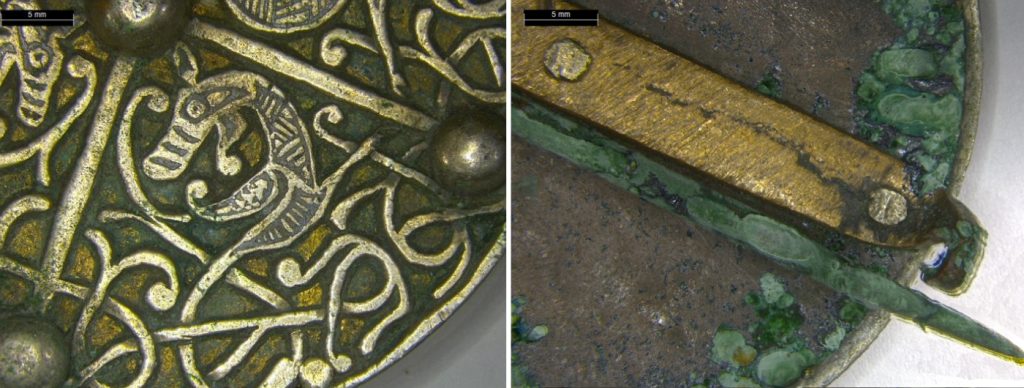
In some parts, you can see where the copper-alloy back-plate has completely corroded, even creating small holes through the gold layer on the front where the corrosion products have forced their way through. Many copper corrosion products take up more room than just pure copper metal or the copper-alloys used in metalwork; they are more voluminous. The result of this is what I like to call ‘mini-volcanoes’ of copper corrosion bursting through the gold layer.
Once the corrosion products were removed from both the silver disc and the gilt surfaces, I consolidated the gold front of the copper-alloy back-plate this time with Paraloid B48N. This is stronger than Paraloid B72. I used this to provide extra strength to the gold on the corroded copper-alloy disc and the front of the disc itself. Doing this, would hopefully allow for further removal of corrosion from the back of the brooch.
Once the gilt front of the copper-alloy disc had been consolidated, more of the voluminous copper corrosion could be removed safely from the back to reveal the original surfaces. This was a time-consuming and delicate job with a scalpel and dental tools, as the copper-alloy disc was still very fragile.
Once the corrosion had been removed to an acceptable level and the conservation process was complete on the brooch, I consolidated the whole of the brooch with a protective layer of B48N. This acts as a consolidant, lacquer and moisture barrier to protect the brooch. The brooch was now ready for display.