

The Vikings! exhibition at National Museum of Scotland gives an amazingly rounded picture of life in the Viking Age – not just the raiding and seafaring, the axes and helmets (WITHOUT horns), but life back home on the farm as well. Various fascinating artefacts help uncover what Viking Age people wore, how they ran their households and, of course, what they ate.
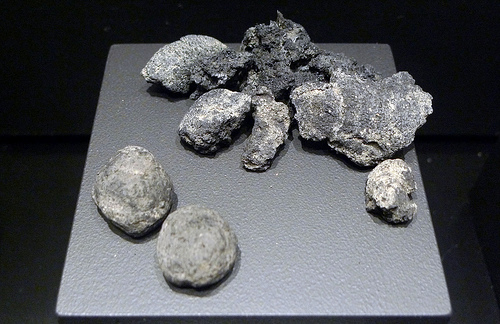
On display in one case are some charred, grey, unappetising-looking nuggets that actually transpire to be Viking bread, found in a grave in Birka in Sweden – nourishment for the afterlife, presumably. Yum.
Experts in Sweden have analysed the samples and come up with a recipe for making Viking bread. Given that my husband is a bit of a dab hand in the kitchen, we thought we’d give it a go. The tenuous link to Digital Media is that you can download the recipe from the National Museums Scotland website here.
The ‘official’ ingredients are:
About 150 g barley flour
About 50 g wholemeal flour
2 tsp crushed flax seeds
About 100 ml water
2 tsp lard or butter
A pinch of salt

We cheated slightly by using a barleycorn flour that mixes ground barley with wheat flakes, as this was the best we could find in the wholefood shop! We also used goosefat in place of butter or lard but as people in the Viking Age would have reared geese (as well as chickens, pigs, cows and sheep) we figured that was probably fairly authentic. You can buy ground flax seeds in wholefood shops and some big supermarkets – they’re also useful for gluten free baking, and are a great way of upping the omega 3 content of bread, cereal, porridge, etc. (Just so you know…)
Here’s how we got on making the Viking bread.


So after all that effort, was it tasty? Well, yes: stodgy (as my gran would put it, it fair clags to your ribs), warming and perfect to accompany a stew on a cold evening!