As a conservator I usually spend a lot of time in the lab actively caring for the collections. In the last few years, my team and I have conserved thousands of objects for the new Art and Design, Fashion, World Cultures and Science & Technology galleries. Now, with the current situation around COVID-19 and the conservation team working from home, I can reflect back on some of the remarkable objects I’ve worked on – and the discoveries I made during their conservation.
The suffering of a Christ figure
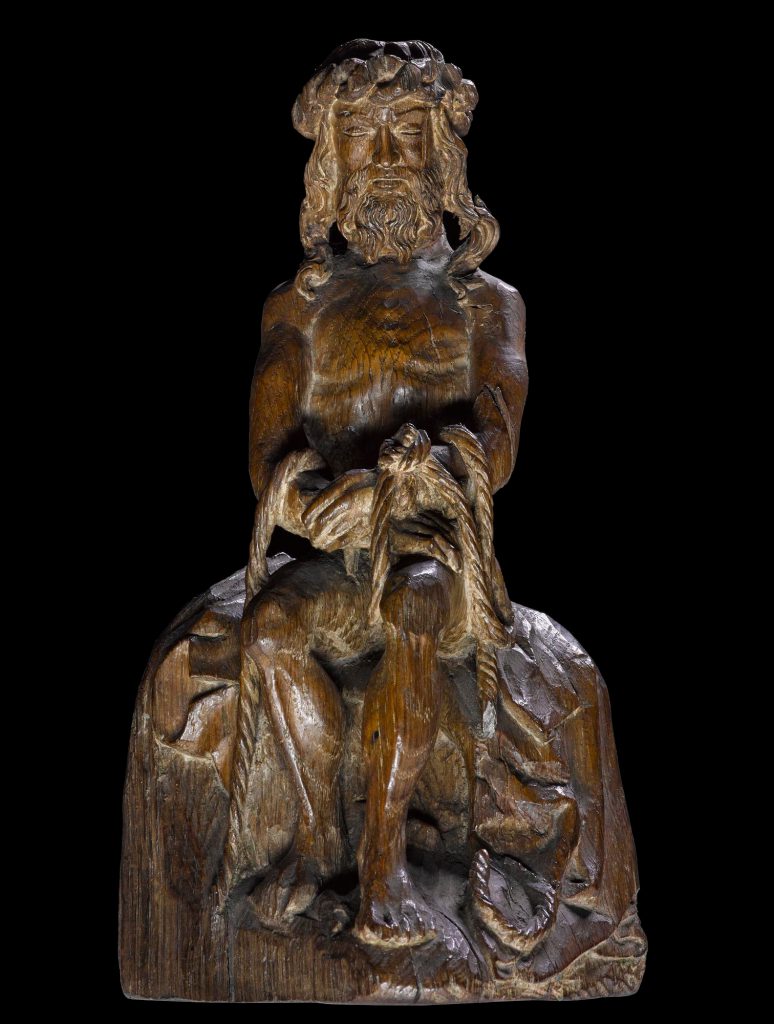
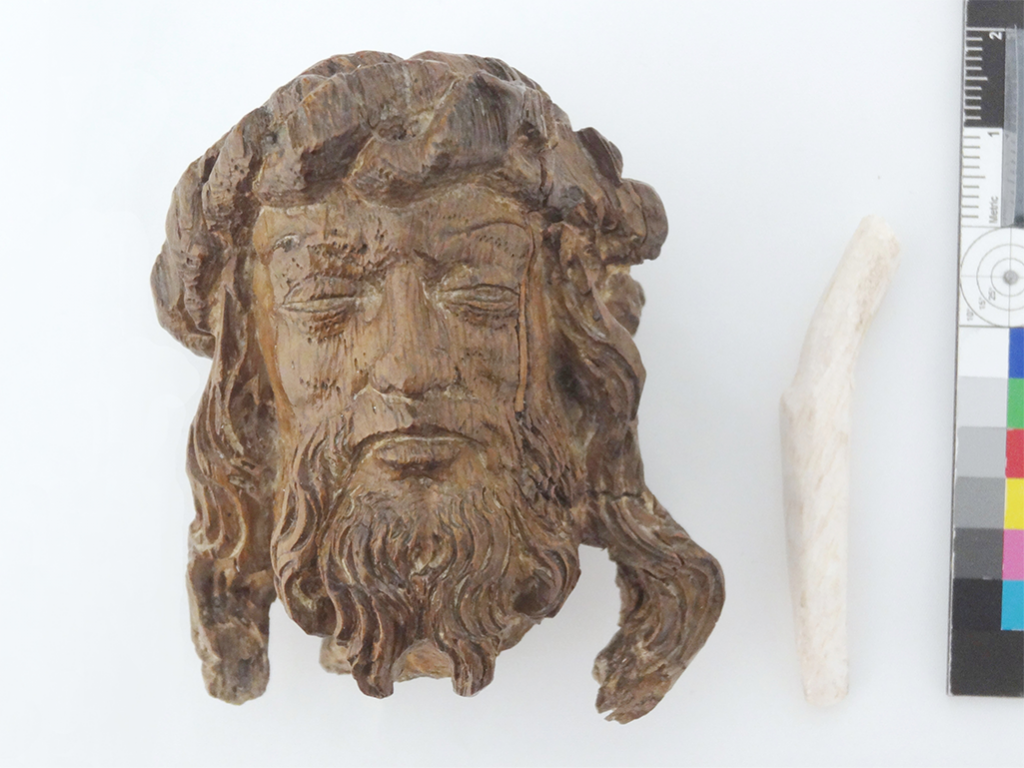
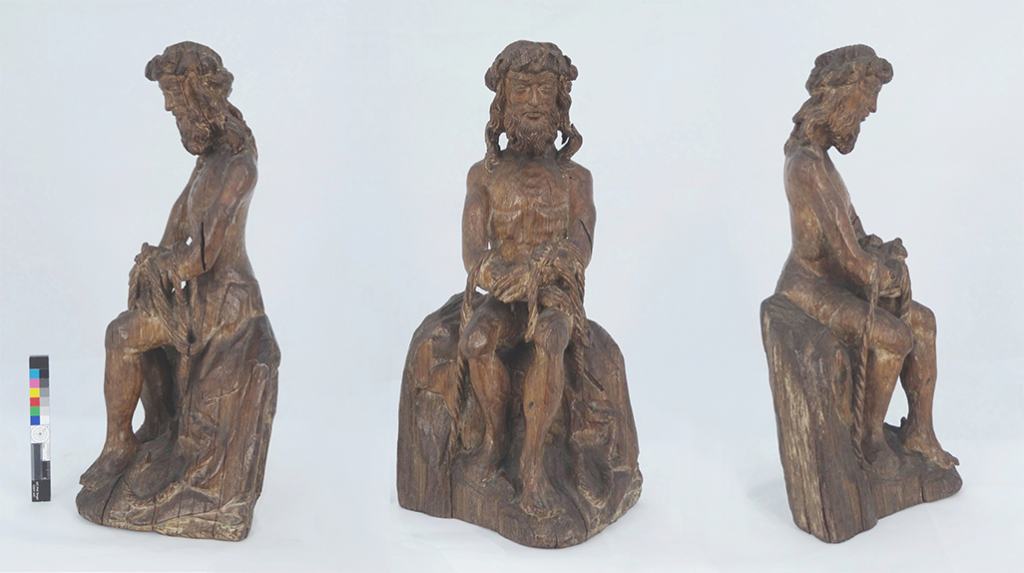
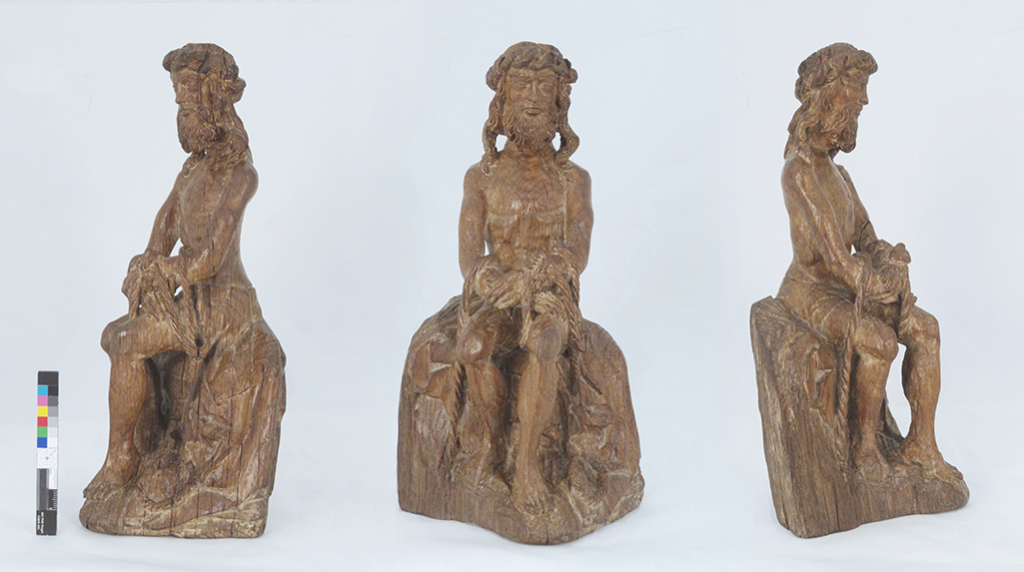
At this time of year, it feels like the perfect opportunity to discuss the conservation treatment of an object linked directly to the Christian meaning of Easter – the Crucifixion of Christ. I’ve previously worked on several objects which thematise the crucifixion, but there is one sculpture that I found especially intriguing. It is a carved wooden sculpture of Christ, seated on a rock on Golgotha, awaiting his death.
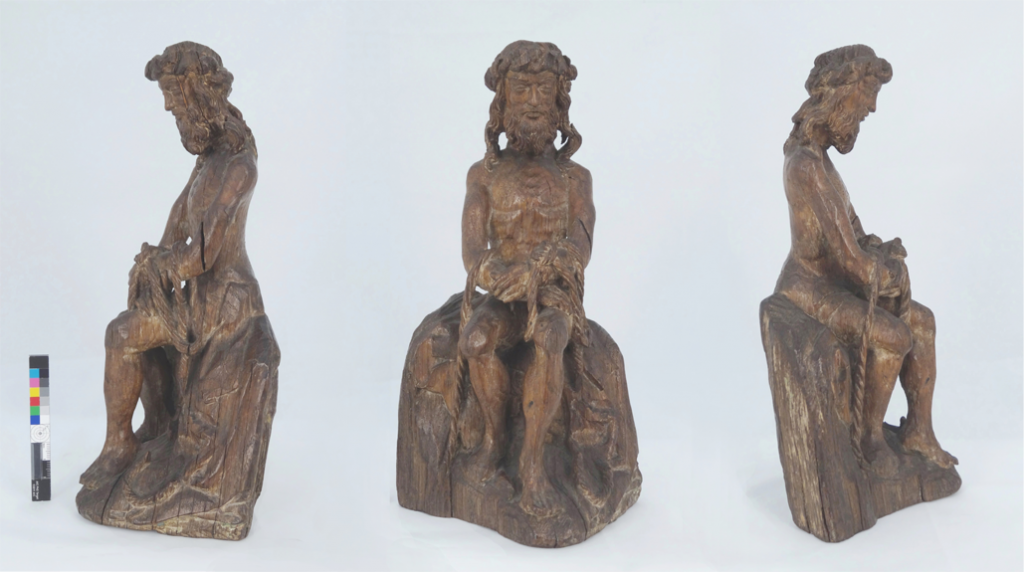
The sculpture is 34cm high and is carved out of oak. It was made in the Southern Netherlands between 1500 and 1525. For its age, it seemed to be in a very good condition. However, closer examination revealed its turbulent past. Not only does it represent the suffering of Christ, the material itself has suffered a lot in its lifetime. But more on this later…
Initially, I expected that the sculpture would only require a light surface clean to remove the dust which had accumulated over the decades. Surface dust hides artistic detail and sometimes underlying problems an object may have. Additionally, it can also contribute to further damage due to its tendency to bind moisture and pollutants to the surface. These catalyse the deterioration of organic substance with time. In this case, all three factors were apparent.
Let’s see what we can find hidden underneath the dust…
Traces of paint layers
As I removed the thick layer of dust and dirt from the surface with a soft brush and a vacuum cleaner, traces of white gesso and paint layers were uncovered. These are mainly present in the crevices and pores of the carved wooden surface. Unfortunately, too little had survived to conceptually reconstruct the entire appearance of the sculpture and the question remained as to what the work would have looked at the time of its manufacture.
Remnants of a whip
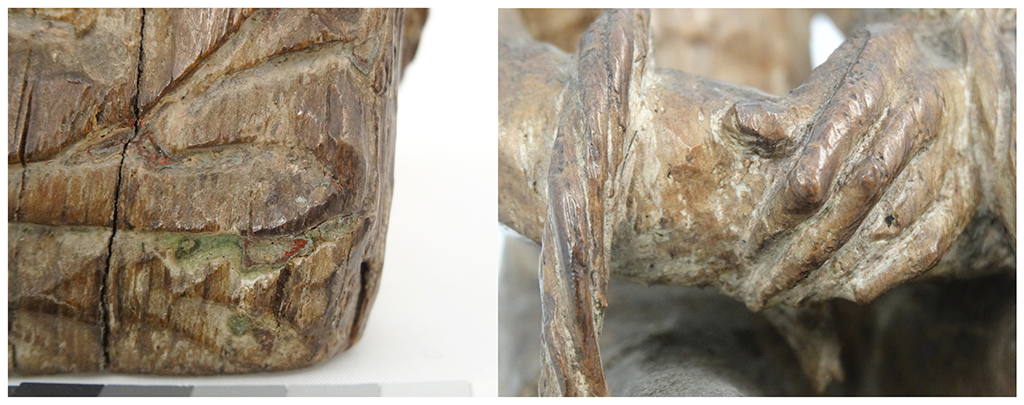
During cleaning, I became aware of a fragmented piece of wood, held in the right hand of Christ and extending vertically up along his left arm. This fragment is the remnant of a whip or a bundle of birch branches which Christ is usually depicted with, as the Man of Sorrows.
Cracks and detached splints in the wooden surface
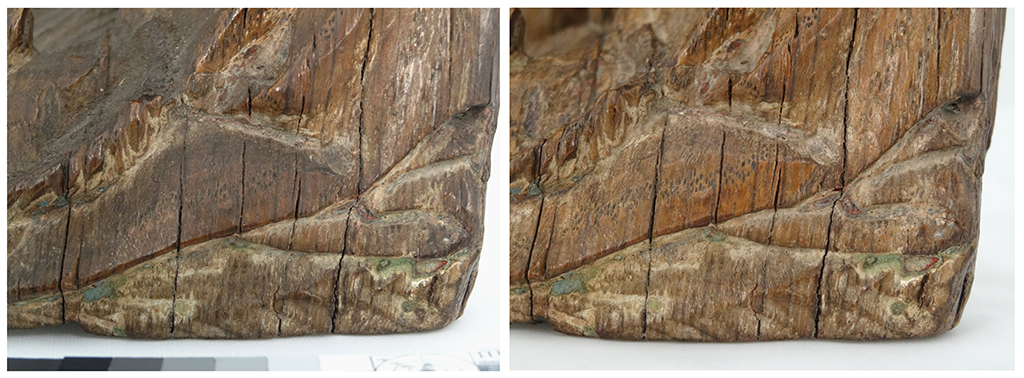
The first obvious damage were the numerous vertical cracks in the wood on the left-hand side of the sculpture. These are radial cracks originating from the pith and become visible in the tangential surface of the wood (see drawing below).
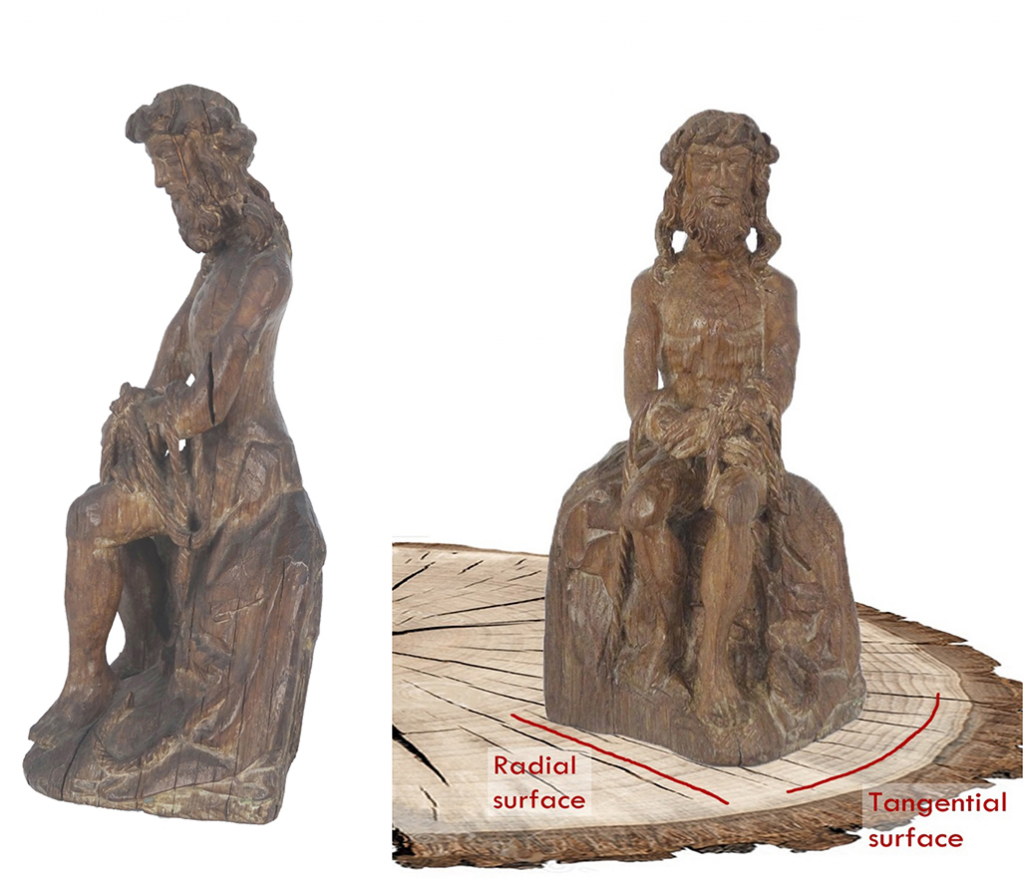
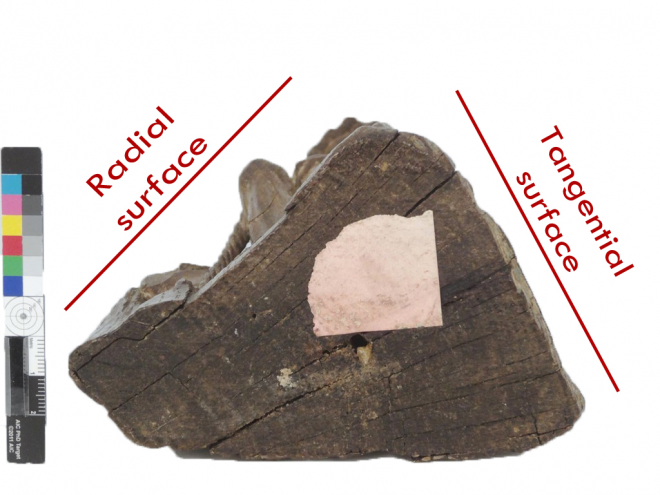
Visual investigation of the underside of the base of the sculpture confirmed it. It showed the cross section of the wood with the radial surface on its right-hand side and the tangential surface on the left-hand side (see image below). Radial cracks can occur naturally due to different rates of radial and tangential shrinkage in the wood. Such cracks become visible in the tangential surface of a piece of wood and in this case at the left-hand side of the sculpture.
A history of various crude repairs – sculpture tortured over centuries
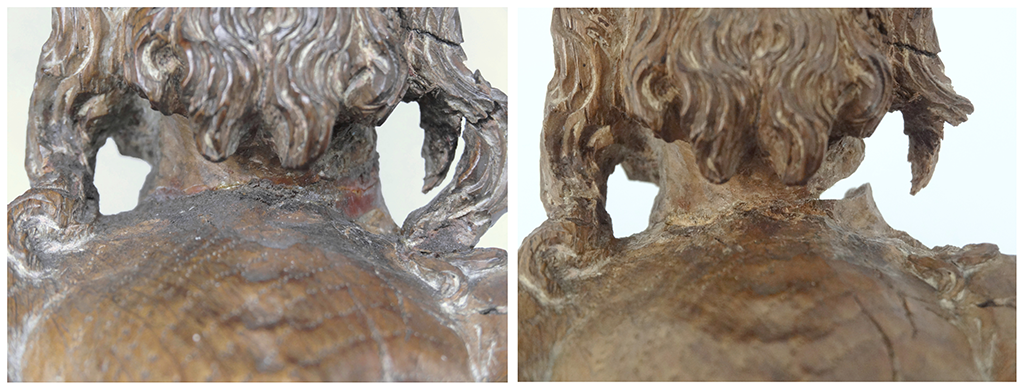
Surface cleaning revealed old repairs in the area of neck and back of head. Various adhesives, filling materials and finishes became visible, suggesting numerous stages of repair. As removal of these progressed, more information was uncovered.
I checked our database for past conservation records and found two. The first in-house treatment had been carried out in 1978 – seven years after the acquisition of the sculpture. It included the reattachment of the broken head with HMG – a transparent adhesive on based on cellulose nitrate. ‘The wood was very hard and non-porous so decided to use HMG adhesive rather than Evo-Stik woodworking adhesive.’ [Feb 1978, A. Wyllie]
The second treatment was carried out in 1986. The adhesive previous must have failed, therefore a white glue (potentially Evo Stik) was applied to re-adhere the head. The gaps and areas of loss were filled with wood powder bond in a water soluble adhesive (probably protein glue). The treatment also included the application of wax onto the surface, where it covered the repairs.
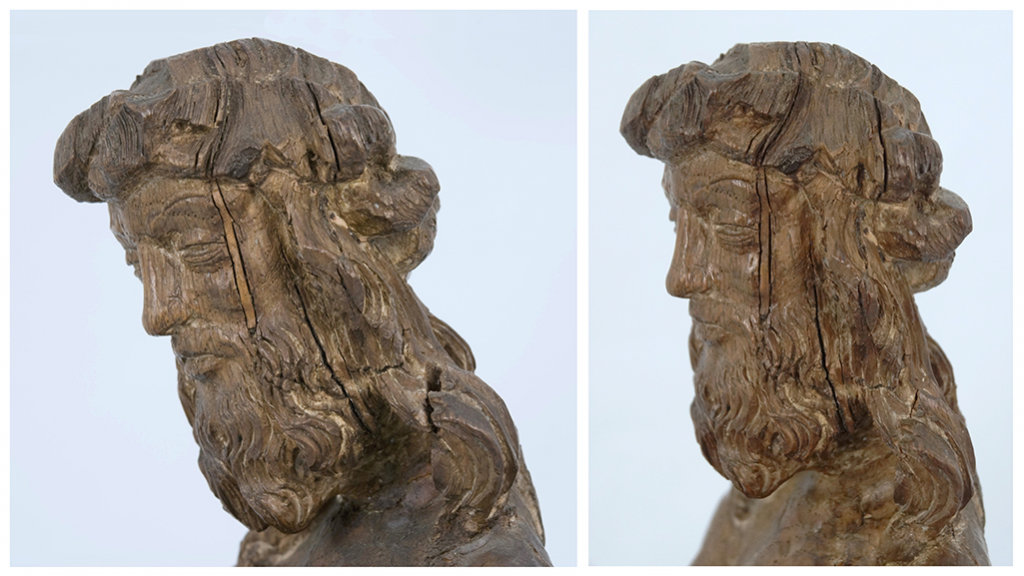
Cracks along the shrinking fills and lifting material were an obvious sign that the 30-year-old repair had started to fail. In addition, there was another important issue made it necessary to redo the repair – the head was not sitting in the right position! It tilted much further forward than it originally would have done.
Excavating through the layers of time!
Removal of the treatment carried out in 1986 at National Museums Scotland
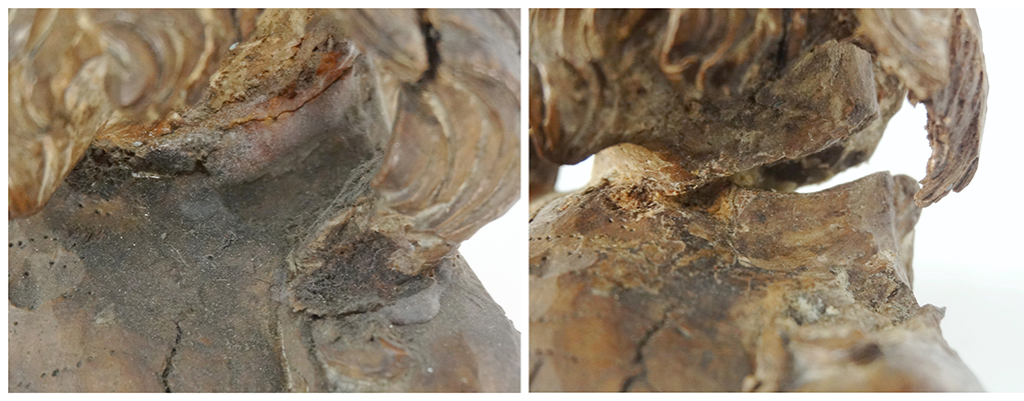
A thick layer of wax and adhesive ingrained with dirt covered the repairs and the adjacent original surface around the neck. These were removed under the microscope with a porcupine quill and a blunt scalpel blade.
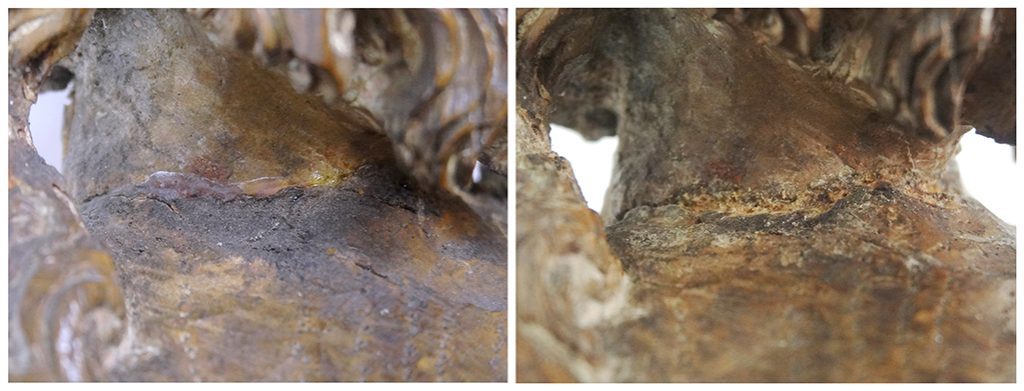
A thin layer of this darkened wax covered the entire surface. This was removed with cotton swabs wetted with IDA, effectively revealing more of the remaining paint layer and gesso.
Parts of the filling material started to become loose and could easily be removed. The remaining material was softened with poultices of cotton wool soaked with deionised water and then removed with a spatula. The white adhesive was removed mechanically with a scalpel and porcupine quill. Remnants of the material were removed with cotton swabs wetted with IDA.
During the removal of dirt, wax, filling materials and adhesive, original surfaces had been rediscovered and the steep angle of the reattached head became more obvious.
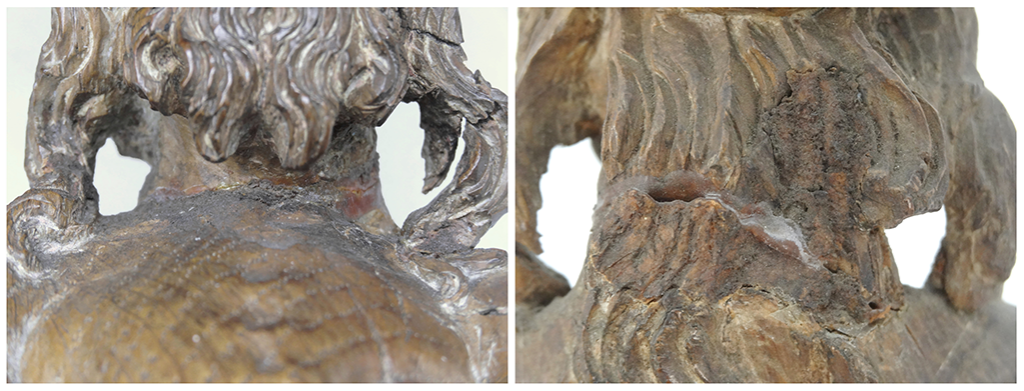
Hidden secrets – holes in the sculpture
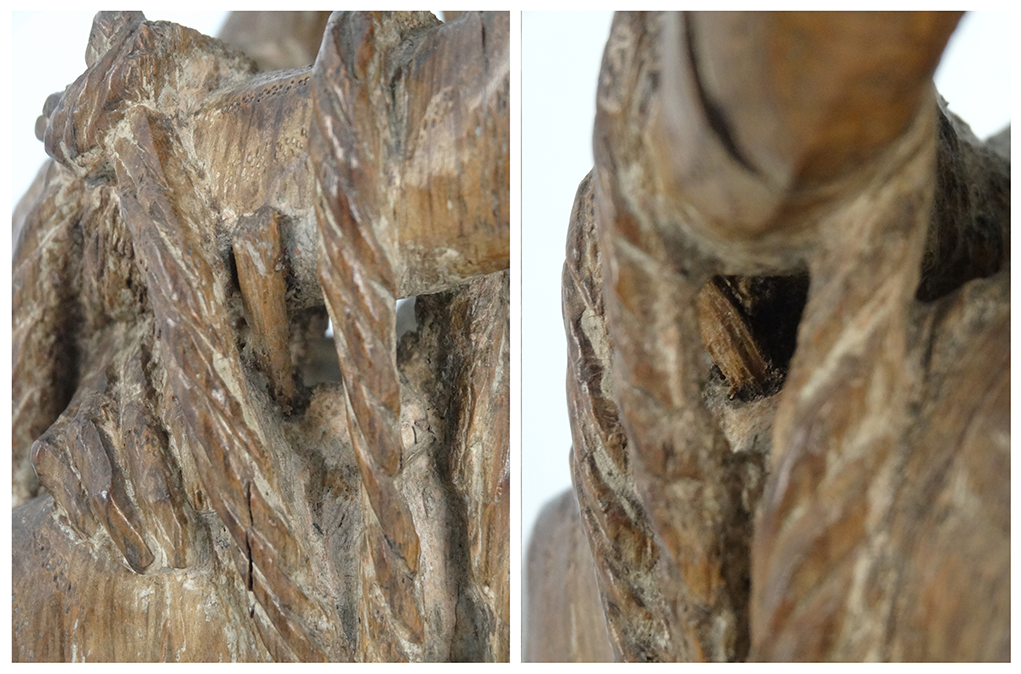
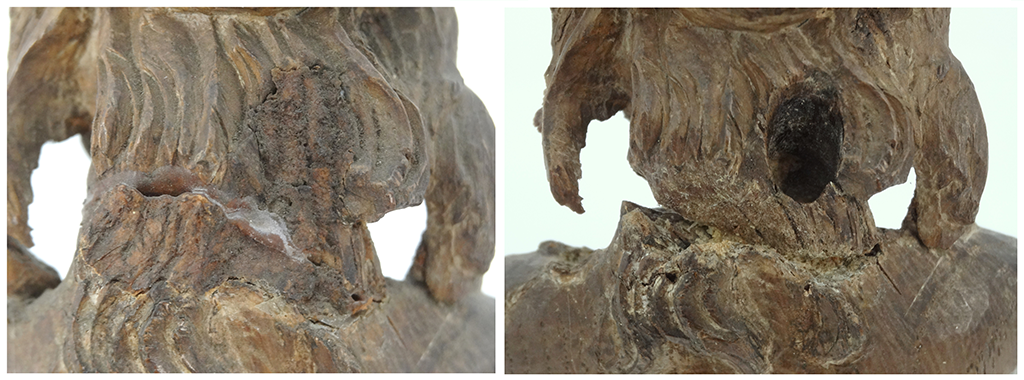
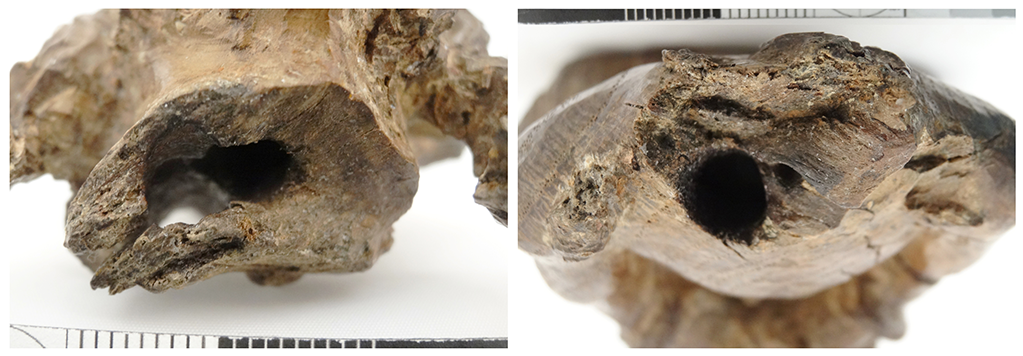
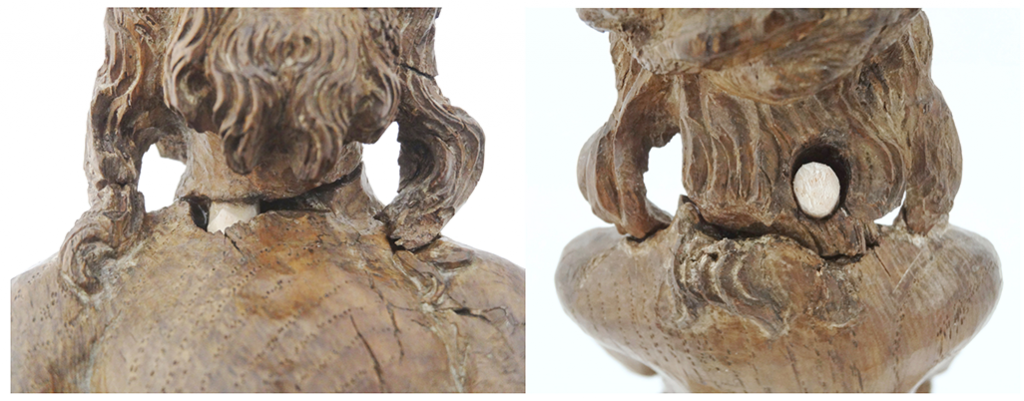
The most interesting discovery was made at the back of the sculpture – a circular hole was found in the back of the neck which extends in a diagonal angle downwards into the sculpture. What was its function?
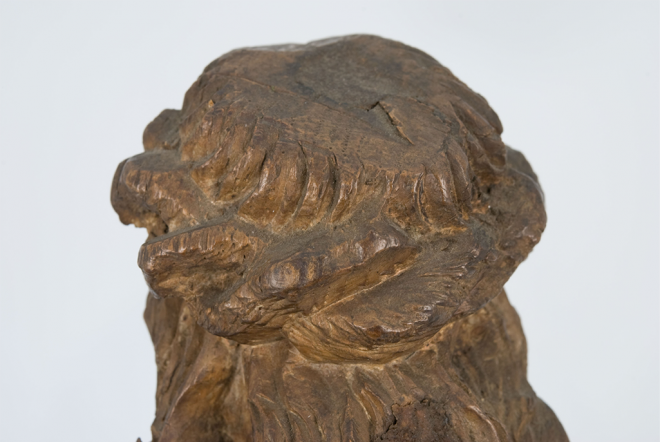
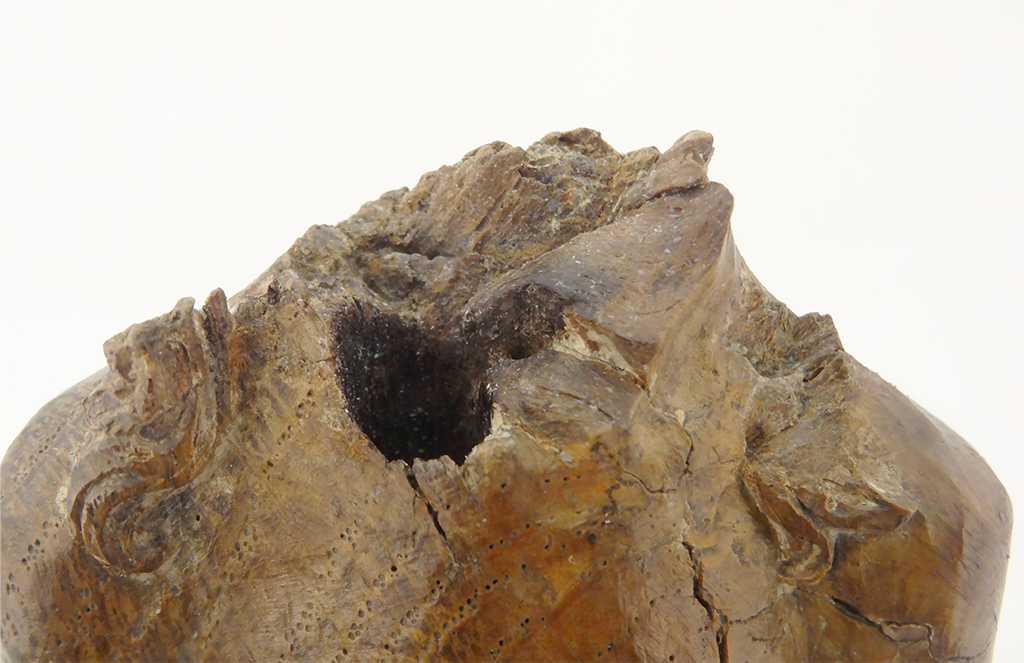
Closer examination revealed the presence of a second circular hole in the top of the head. This hole was well closed up with a stable filling material only visible due to a light colour difference in the surface. I decided not to disturb it.
With the complete removal of restoration materials and the detachment of the head, the function of the two circular holes became clear. The holes were bored through the head into the body and were intended to be dowel holes.
The use of dowels for the repair of wooden objects is a traditional method originating from the carpentry craft, but is less common in the repair of sculptures. Dowels can achieve a very solid and long-lasting join whereas an adhesive might fail with time. Also, a skilled craftsperson is able to employ doweling in a discreet and invisible way. However, dowel holes need to be cut into the original material and nowadays we would not use this conservation method from an ethical point of view.
As a very old technique and it is hard to determine when this repair was done. Due to the fact that the break edges of this hard wood are heavily worn, I assume that the repair must have been carried out in the early lifetime of the sculpture – a long time before electric drills were available, possibly pre 1800.
So how were the dowel holes made?
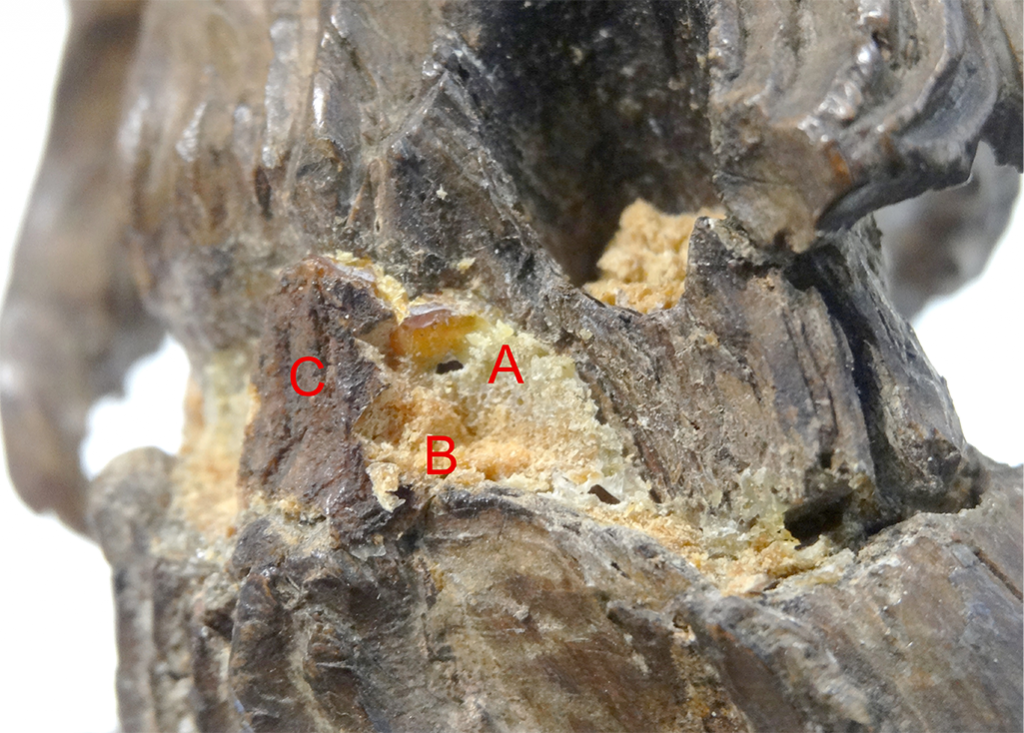
There are two methods for making dowel holes. The first involves using a hand drill. Oak wood is very hard, especially when drilling into the end grain surface (cross section). It must have been a painstaking job! I think it is more likely that another method was used, possibly in combination with the first. The smooth and blackened inner surface of the holes support this thesis, as these suggest that they might have been made by thrusting a searing red-hot iron rod into the wood to burn out the material and achieve the desired hole.
But why 2 holes? The answer is easy – the first attempt simply failed!
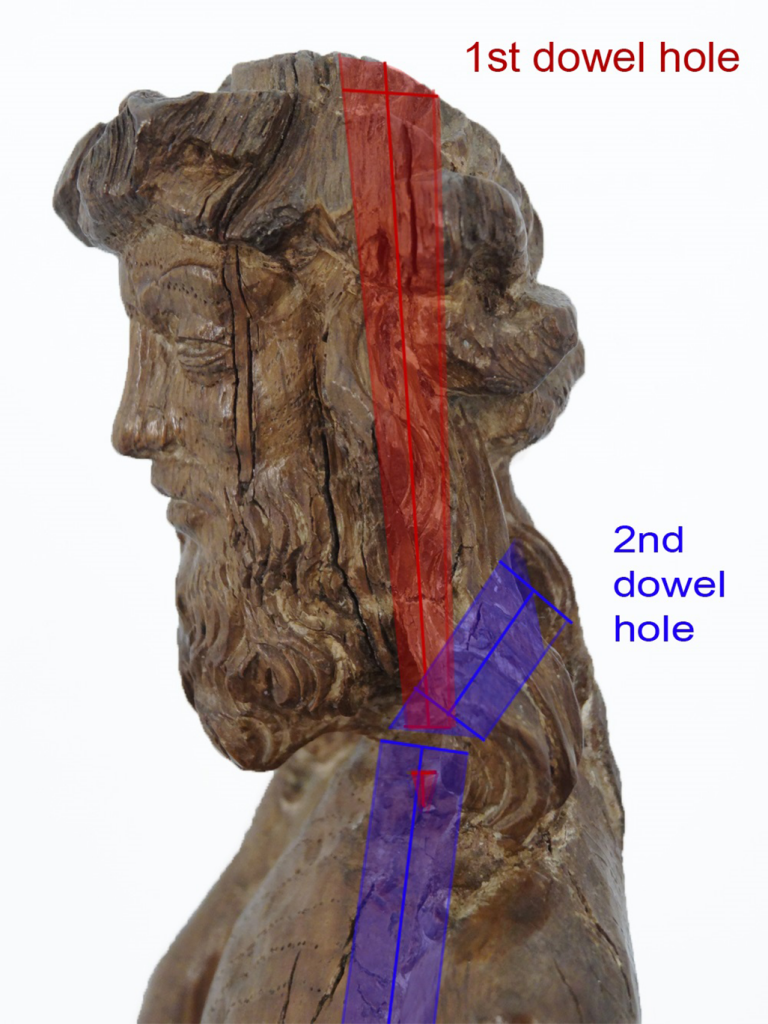
The first dowel hole was made from the top of the head, extending vertically down into the body (see images above – hole in the right-hand side of the material). For some reason, the hole reached only slightly into the body, not deep enough to securely connect both fragments with a dowel. I asked myself, why did they not extend the hole? A closer look drew my attention to the fine cracks in the chest of the sculpture. At first, I assumed that these were radial cracks as well, but I noticed that some originate from this drill hole and others have an atypical appearance – a zig zag pattern like flashes in the sky they went into all directions. A great deal of force is necessary to cause such cracks.
One theory is that the drill got stuck and caused immense pressure due to material building up in the cavity while forcing it further into the wood. However, I suspect another reason. The blackened and smooth wooden surface around the dowel hole give the impression that someone thrust a hot searing iron through the head and tried to force it with hammer strokes deeper into the body while the tip of the iron had cooled down too much to burn deeper into the material. This would mean that the continuing hammer strokes caused the wood to split and crack, nearly resulting in the sculpture bursting from inside… We are unlikely to ever be sure if this is indeed what happened.
The second dowel hole was made from the back of the head. The diameter of the hole and the surface suggest that the same tools were used. The dowel hole has nearly the same depth as the first one, but due to the entrance point, the distance to the body was shorter and the hole reaches far deeper. The second hole had to be made at a slanting angle which caused a misalignment of the head.
I couldn’t find remnants of a dowel in the holes. I assume that the wooden dowel deteriorated over time and resulted in the renewed separation of the head and the subsequent repair with adhesive, instead of another dowel. It is unclear when the removal of the dowel took place. In fact, the first treatment report doesn’t mention the presence of an old dowel at all, which suggests that it had already been removed before its acquisition in 1971.
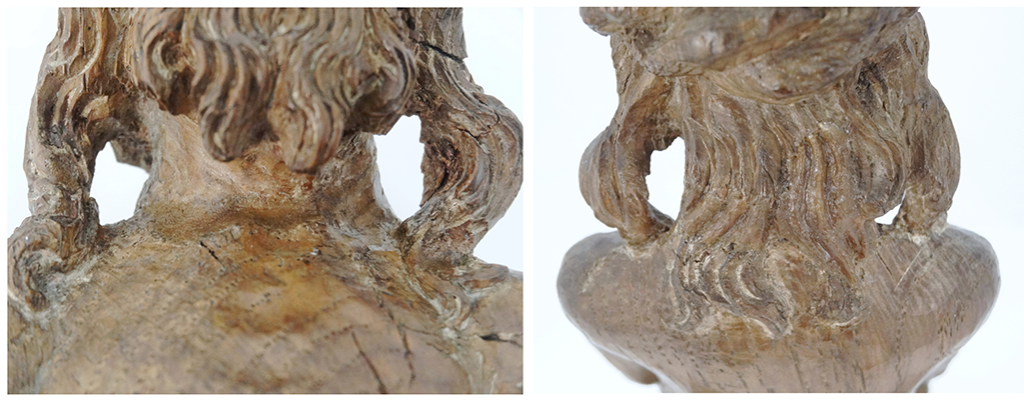
Reintegration of the head and restoring dignity
I decided to make use of the existing dowel hole to reattach the head. To correct the inclination of the head, I carved a dowel from balsa wood in a slightly buckled shape. I then secured the dowel with hide glue, applied in the head and body, to hold it in the right position and to reinforce the attachment.
The worn break edges around the neck showed numerous losses. I filled these and the dowel hole with fine wood flour bond in fish glue and inpainted the fill with acrylic paint.
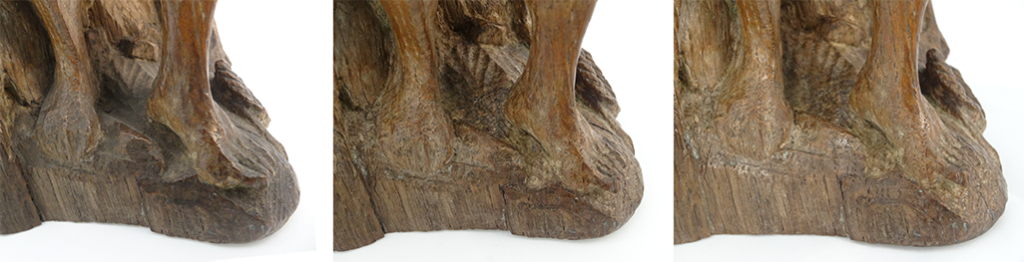
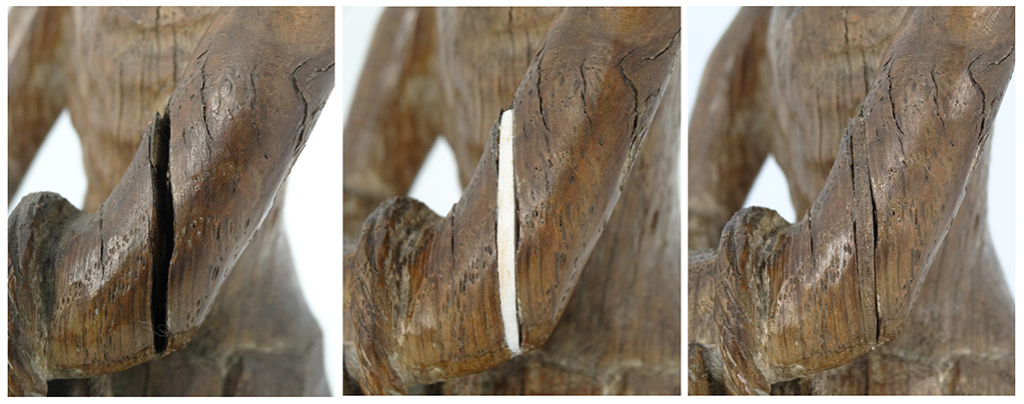
Two large radial cracks and gaps were filled with balsa wood and tinted in with acrylic paint to reduce the risk of further damage in these areas and also to prevent dirt settling into the cracks.
During the treatment of the Christ figure, invasive repair practices were discovered which raise new awareness of the sculpture’s turbulent past.
Our conservation achieved its goal to stabilise the sculpture and most importantly, for me, to reinstate the original appearance. With the change of the angle of Christ’s head, I feel he has recovered his dignity. Prior to treatment the scultpure had been something pitiful, but it now radiates power, strength and calm, despite the heavy sorrow.
View the collections record of the statue (A.1971.54) on the National Museums Scotland website.